CTIS - Covenant University Traveller Information System
Apr 2018 • 6 min read
The concept of the Advanced Traveller Information System (ATIS) is a part of a broader spectrum of traffic systems know as Intelligent Transportation Systems (ITS). Traffic congestion is on the rise, and there exists a growing interest in road demand management and road pricing solutions.
Advanced Traveller Information Systems provide assistance to travellers and commuters alike, helping them to select routes, transportation modes (buses, cars, bicycles etc), how to minimise journey costs, possible delays before they set out, and as well as during their journeys.
My project focused on building a prototype of an ATIS for the Covenant University community. A typical solution for an ATIS would be to display schedules for the main mode of transportation in the community - shuttles. But as there was no existing transportation system with defined schedules, a more innovative solution was needed.
I decided to build a system that could:
- Track shuttles and provide users with real-time updates on their locations and estimated time of arrival.
-
Provide directions to locations on campus, whilst providing more information about each and other helpful info.
This way, the system could slot right in to the way things were already being run.
System Breakdown

In the paper, I called the architecture Micro-service architecture. But in hindsight, it’s more of a regular distributed architecture.
The components include:
- Rest API - Written in Python using Flask as it’s framework.
- Client-Side/Frontend Service - Written in AngularJS, styled with CSS.
- MySQL Database
Database Design
The structure of a system and how it’s intended to work is usually depicted best by the database design, especially when using a relational database like MySQL. I worked to make sure the design tried to follow the ACID principle as much as it could.
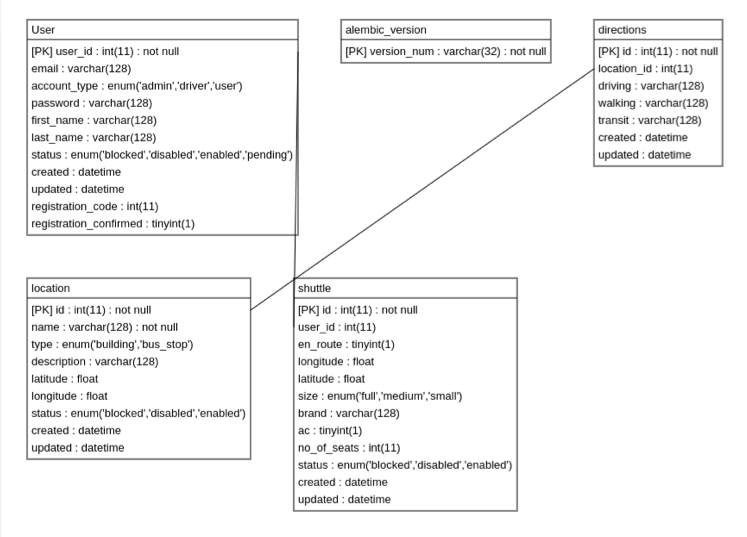
Brief explanations of each table:
- User table
This table is used to store all users’ details and is vital in the application logic. Each user can either be a regular user, an admin or a driver.
- Shuttle table
This table is used to store all shuttles’ details. The table has a many-to-one relationship with the users table, as the id of the user (with the account type - driver) who the shuttle belongs to is stored in the “user_id” column.
- Directions table
This table is used to store the directions to a particular location. The table has a one-to-many relationship with the locations table.
- Location table
This table is used to describe each location to be stored. A location can either be a building or a bus stop.
Geolocation
An ATIS is a location-based service, which relies on the user’s location as an important factor influencing it’s results. Most major browsers have geolocation services built-in, and available to developers of applications using the navigator.geolocator object.
The geolocator object is embedded in modern browsers, and can be used with the permission of the user. When the navigator.geolocator.getCurrentPosition function is called, the browser makes an AJAX (Asynchronous JavaScript) request to get the users cartesian co-ordinates (lat and long).
Of course, this comes with its limitations. Such as:
- Disparity in browser types and how accurate their geolocation services are.
- Users have to manually give consent for their location to be used.
- The services are only sufficiently accurate on devices which have GPS capabilities.
Real-Time Processing
For the system to provide a good user experience, the shuttle information provided must be available in real time. Various services are currently available to integrate real-time capabilities into location services, but for this implementation, the navigator object also has the ability to track a user’s location using its watchPosition function.
The function is an event listener which is triggered when the user’s position changes. When a position change event is fired, the shuttle’s location is updated and broadcast to any clients listening. When the driver logs out from the dashboard or the browser window is closed, the listener is switched off.
The real-time functionality of the system enables shuttle markers on the map to be changed in real-time, providing the user with real-time geographical information about the driver. This service was provided using PubNub.
Implementation
- User Interface
- Home Screen:
This screen provides high-level information about the project and its features. It also provides the option for shuttle drivers to sign up to use the platform, as well as copyright information.
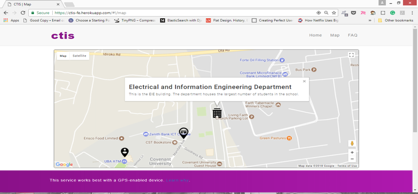
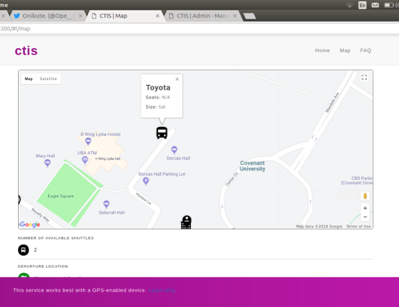
- Map Screen:
This is the screen which provides users with the required travel information. It includes an interactive map, on which markers are placed to indicate the locations of the components of the system which include the user’s location, buildings, bus stops and shuttles. The map provider used here is Google Maps.
Map Setup
Setting up the map involved a multi-step process, resulting in shuttle locations being placed using a shuttle icon and markers used to trace their movement. Instead of showing code, these flowcharts explain the various steps involved. The main work involved ensuring the location of the shuttle was broadcast using the PubNub channel to all clients, hence updating the location of the shuttles on their maps.


- FAQ Screen:
This screen provides users with answers to frequently asked questions, eliminating the need for the users to ask questions which have been previously asked and answered. This is a common concept in modern Web applications.
- Driver Dashboard:
Provides drivers with the ability to manage their shuttles and also to modify their driving status, which would determine whether their shuttles are displayed on the map. The interface consists of two main screens, which are: **
- Home Screen:
This screen provides the driver a display which shows his driving mode, and enables him/her to switch between modes. It also provides navigation to the other screens.
- Add Shuttle Screen:
This screen provides the driver with the ability to add a new shuttle. On form submissions, a new shuttle is added to the database with the driver’s id.
- Manage Shuttles Screen:
This screen provides the driver with the ability to manage shuttles – to be able to view all, update individual, and disable the status of shuttles.
- Admin Dashboard:
This is also a dashboard interface, used by administrative officers to manage the entire platform. The interface consists of five screens, which include:
- Manage Shuttles:
This screen is used by the admins to view and update all shuttles. The tables are generated dynamically and entries can be edited in-line, eliminating the need for another screen just to update an entry.
- Add Shuttle:
This screen provides admins with the ability to add a new shuttle (on behalf of a driver). The admin selects the driver, and a new shuttle is created in the database with the driver’s id.
- Manage Users:
This screen is used by admins to view and update users’ status, including drivers and other admins with lower privilege levels.
- Add New User:
This screen provides admins with the ability to add new users to the database. The given user can be a driver, or another admin.
- Manage Locations:
This is used by admins to view all locations and edit their attributes. Attributes can also be edited in-line on each row.
- Add New Location:
This screen provides admins with the ability to add a new location to the database. The required fields include the location’s name, description, type (bus stop or building), latitude and longitude.
- Add Directions To Location:
This screen provides the admins with the ability to add directions to a location. This would enable the directions feature in a particular location’s description section on the map interface.
Deployment
Heroku was used in this project to deploy both application services. The platform made deployment of these two services easier, by enabling deployment using a Procfile to indicate the various processes, and a configuration file synonymous to the programming language being deployed to the server, which were Python and Node.
Summary
This was basically building a sort of “Uber for shuttles”, with a few more localised features. You can check out the source code for the API and frontend. Feel free to check it out.
I hope you enjoyed reading this.
Shalom.
To help me grow on Youtube and learn about Monitoring, Machine Learning, and SRE, please subscribe here.
And to get notifiied about new posts, please subscribe here.